[icm final] True Love Tinder Robot v1

2015-11-30 22.37.20

Here we are, at the end of ICM! How time flies.

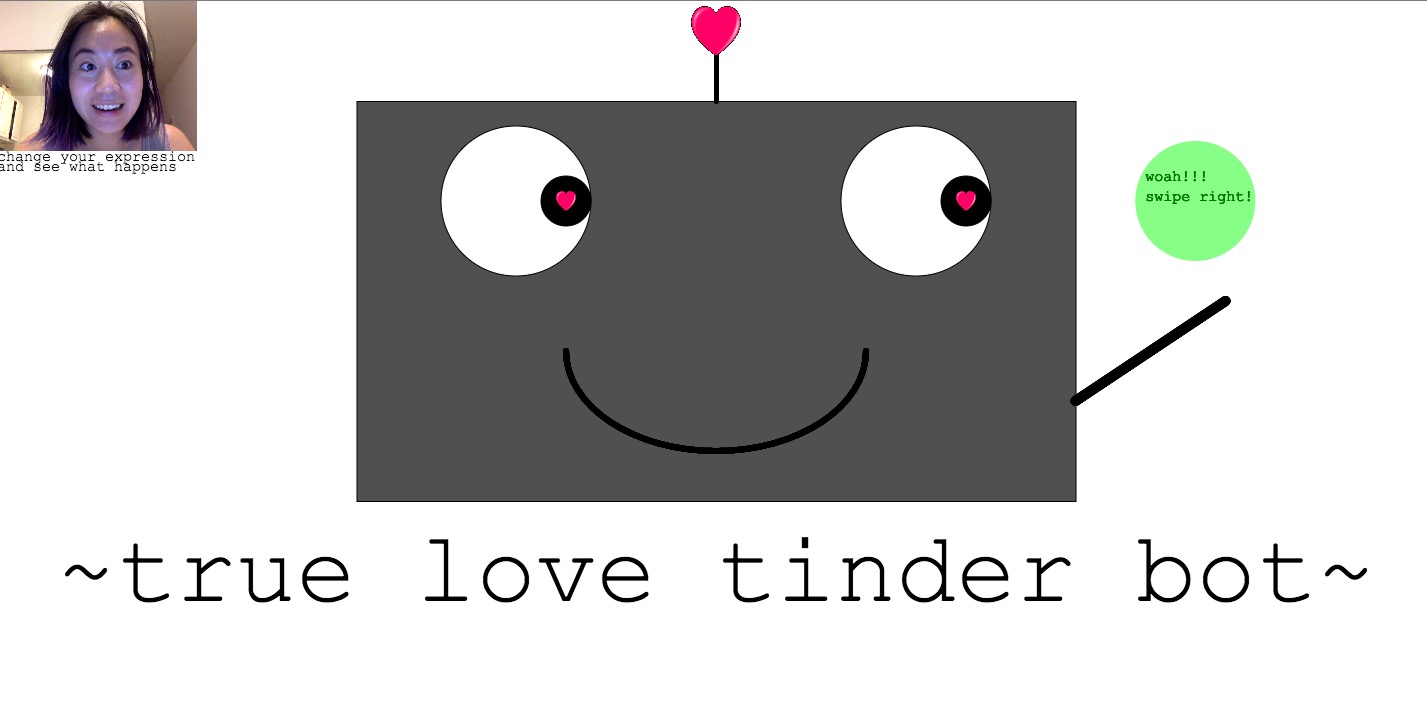
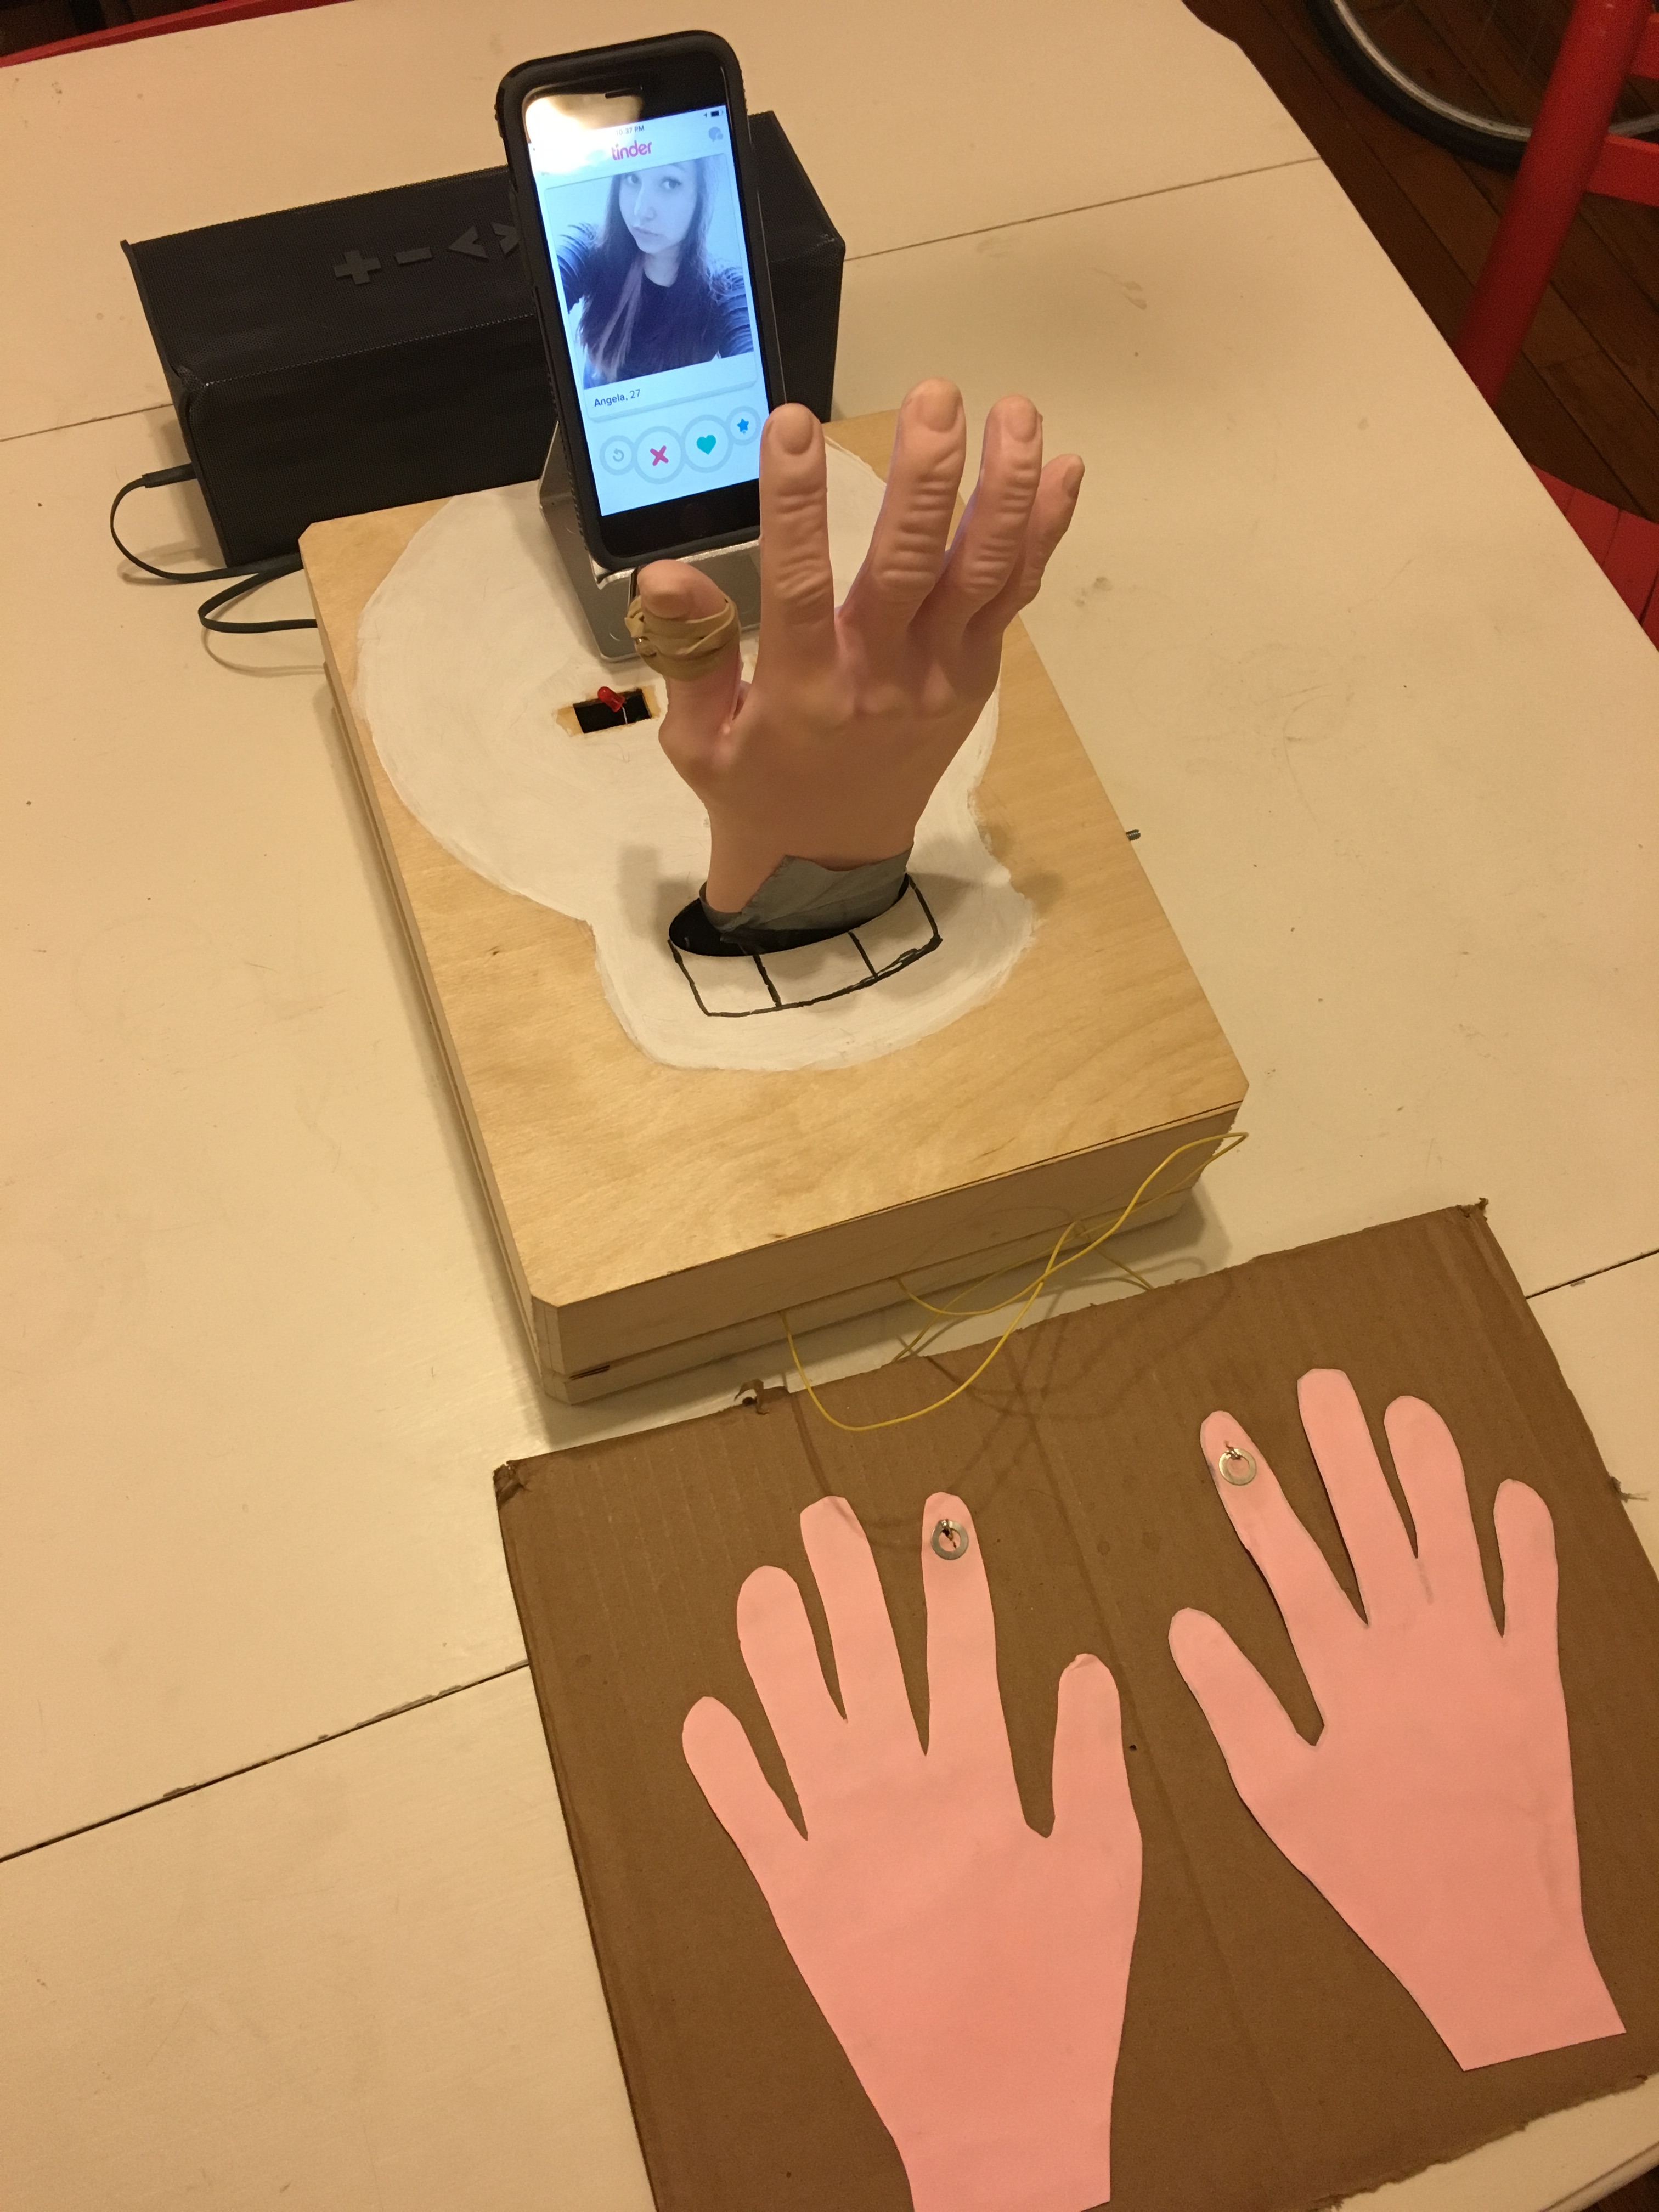
This is the first prototype of my ICM/pcomp final project, the True Love Tinder Robot. The fabrication and wiring is not quite done yet, but this being a post about my ICM documentation, the code is more complete, and that’s the part I’ll focus on here.

Here’s how it works:

You put the phone down in front of the robot hand with Tinder open. Then you put your hands on the sensors. The robot will begin talking, telling you that you have a few seconds to look carefully at each Tinder profile. As you’re looking, the robot will reading your heart’s desire through the sensors, and then swipe on your phone for you*, all the while announcing what it’s doing.

*(okay the physical swiping part isn’t done, but will be next week!)

2015-12-02 15.53.48

Now, about the code:

One of the biggest coding challenges in this project for me was working with counting and timing. A number of things happen in the project that depend on time: how long it takes to get a reading, how long you have before the robot swipes, how much time can pass with no sensor reading to determine that the user has left and that the next user should start from the beginning of the sequence. In Arduino, the only built-in timer is millis(), which counts the milliseconds from when the program launched. Therefore there’s no simple way to say, “when this event happens, do something for five seconds, and then do something else for three seconds, and then start over.”

I did a few things to solve this problem. The first was that I turned my series of convoluted if statements into a finite state machine, which made it much easier to organize.

//state machine
#define waiting 1
#define checkIfNewUser 2
#define newUser 3
#define giveIntro 4
#define beginSwiping 5
#define calculate 6
#define changeHasSwipedLeft 7
#define changeHasSwipedRight 8
#define swipeLeft 9
#define swipeRight 10
#define getNoSensorTime 11
#define ending 12

Another was saving a millis() value when something crucial happened, and then taking the difference between that and the current millis() to act as a timer.

static unsigned long ts;
timePassed = (millis() / 1000) - ts; //the amount of time passed is the current time minus the last time saved

And I used boolean flags to mark when an event happened.

   case changeHasSwipedLeft:
      hasSwipedLeft = false;
      state = swipeLeft;
      break;
    case swipeLeft:
      hasSwiped = true;
      if (timePassed >= 6 && hasSwipedLeft == false) {
        emic.speak(swipeLeftWords[iLeft]);
        iLeft++;
        hasSwipedLeft = true;
        handServo.write(servoLeft);
        digitalWrite(swipeLeftRedLed, HIGH);
        digitalWrite(swipeRightGreenLed, LOW);
      }
      if (timePassed >= 9) {
        state = beginSwiping;
      }
      break;

Another thing I thought about a lot was the personality of the robot. It was important to me that the robot speaks to you, both to explain what’s going on, but also to add to the experience. I was inspired by the character GLaDOS from the videogame Portal, who is an AI that’s passive-aggressive, dark, and very funny. The lines I wrote for the robot were an attempt to give a similar sense of character, even for a short interaction.

A first prototype of my creepy robot

A video posted by Nicole He (@nicolehe) on

//platform.instagram.com/en_US/embeds.js

Overall, I’m happy with the way this is turning out. The physical part is now finished yet, but I’m glad that the code is doing what I want it to. I learned a lot during the process, not just about specific coding techniques, but also about how to find and use libraries, upload on Github, and generally Google around for answers to my many questions.

My code is on Github.

https://github.com/nicolehe/true-love-tinder-robot

[icm week 10] Final project idea: True Love Tinder Robot

INTRODUCTION

tinder_match

Two things.

Number one: It’s common these days for people to use technology to look for sex and love. Some stats show that 1 in 4 couples these days have met online. Dating sites and apps like OkCupid and Tinder give us the tools to find the people we are interested in, but we still strongly feel that the choices we make in our partners are our own. It’s not a stretch to think that as the algorithms get better and the technology advances, it’ll do an even better job of matching us with potential partners.

image

Number two: it’s also increasingly acceptable to buy consumer devices that tell us about what’s going on in our bodies. The Nike Fuelband, the Fitbit, and now the Apple Watch read our biometric data and tell us about our exercise habits and in turn suggest how we can improve ourselves.

Maybe it’s not a stretch to think that we’ll eventually combine these two things.

My final project idea, as mentioned in previous posts, is a True Love Tinder Robot. I want to explore the idea that the computer knows us better than we know ourselves, and that it has a better authority on who we should date than we do. Before I go into the specifics of my own project, here are a few examples of similar works other people have done.

INSPIRATION

1) Social Turkers: Crowdsourced Dating (2013) by Lauren McCarthy

Screenshot 2015-11-12 10.34.51

Lauren, who is also my teacher for this class (hi Lauren!) did a project where she went on dates that were live-streamed in realtime to Mechanical Turk workers, who gave her feedback as the date went on.

2) Lonely Sculpture (2014) by Tully Arnot

Tully made a finger that just says yes to every Tinder profile it comes across. The lifelike, grotesque finger in this project is quite evocative and gave me inspiration to use a lifelike hand for my own robot.

3) Tender (2015) by Cors Brinkman, Jeroen van Oorschot, Marcello Maureira, and Matei Szabo

JAwaxFU

Tender is literally a piece of meat that swipes right.

MY PROJECT

IMG_0935

Short description:

The True Love Tinder Robot reads your true heart’s desire as you are looking at Tinder profiles, and then physically swipes on your phone for you. Literally put your love life in a robot’s hands.

Here’s the idea of how it works in its current iteration:

I’m planning on making a lifelike, robotic hand. The hand will be on a box, housing LEDs in a heart shape. In front of a hand will be a stand to hold a phone. There will also be a speaker on or next to the box.

The user puts their phone in front of it, with the Tinder app open. The user then puts their hand on the sensors next to the box. When the robot is ready, the LEDs will light up and the robot will say “I’m ready to find you love” (or something like that). The robot will also explain that you have five seconds to look at each profile, and then it will read your true heart’s desire and swipe accordingly. It then begins to swipe.

Based on the biometric data from the sensors as the user is looking at each profile, the robot will decide whether or not the user should date someone. When the robot thinks the user is not interested, the hand will swipe left and the LEDs will turn red, and the robot will announce that they are not a good match. On the other hand, if the robot thinks the user should say yes to the person they are looking at, the hand will swipe right and the LEDS will turn green and the robot will announce that it’s a match.

Throughout the process, the robot will say things to reassure you to trust it.

PROGRESS

Last week I tested a camera and an emotion-reading library as a potential sensor. It was interesting, but I decided that I won’t use a screen because it’s distracting, and I probably won’t use a camera.

I haven’t decided yet what biometric sensor to use, so this week I’ll have to test the heart rate monitor, as well as try a GSR.

The bulk of the ICM-related work will be, I think, working with audio and making sure the robot responds appropriately.

GOALS & QUESTIONS

I want this project to be sort of amusing, kind of creepy and slightly embarrassing. I want the user to feel a tension  between the robot assuring you that it knows best and not being sure whether or not to trust it. I want the user to question whether or not we should let a computer make intimate decisions for us.

Some questions:

  • How can I make the robot evoke the feeling that it has authority? (Besides calling it a robot.)
  • How can I make the experience interesting for spectators as well as the user?
  • What type of things should the robot “say?”
  • How should the interaction end?


[icm week 9] Swipe (capture & CLM tracker)

Screenshot 2015-11-04 22.42.43

(TLDR: See my Swipe sketch from this week here.)

I did something pretty simple this week. It’s just a part I decided to add to my Tinder Robot project, which I will likely also make my ICM final. The purpose of this sketch was mostly to test if I could use facial emotion reading as one of my sensor inputs for my robot.

I built this sketch in P5 off of the emotion reading CLM Tracker example, the libraries of which are quite dauntingly complex:

Screenshot 2015-11-04 23.02.18

…but I guess that’s why we use libraries rather than make everything from scratch.

Keeping with the idea of my Tinder robot, I wanted to use facial tracking/emotion reading as one of the sensors that would determine whether or not the robot would swipe left or right.

What this means for this sketch was that if the user was making an expressive face (indicating strong emotions), it would swipe right. If the user was not making an expressive face (indicating ambivalence), it would swipe left.

The way I determined whether or not the user was making an expressive face was by adding up all the values the tracker gave for each emotion it detected. The higher the value, the more of that emotion you’re expressing. This should mean that a high total value indicates a strong emotional reaction.

Screenshot 2015-11-04 22.42.54

I’m satisfied that the general concept of the sketch works, but it’s really just the bare minimum of what I have to do, so I’m considering this one just as an initial test.

Check it out here. My sketch code is below.

Continue reading “[icm week 9] Swipe (capture & CLM tracker)”

[icm week 8] Soulmate Machine (data & APIs)

Screenshot 2015-10-26 00.07.42

(TLDR: Check out the Soulmate Machine here.)

For this week’s assignment to work with data, I’m not sure why, but I knew pretty quickly that I wanted to use Petfinder’s API.

If you are tragically unfamiliar, Petfinder is a website where you can find all sorts of adoptable pets across the country.

I signed up for an API key, read the documentation, and got to work pulling JSON from their site. They had a rather interesting “get random” method that allows you to find a random pet in their database, picking from specific characteristics like breed, size, age, and more.

I thought it’d be fun to make some kind of pet “matchmaking” based on some questions you were asked. (I certainly have a soft spot in my heart for internet quizzes).

I picked 5 questions for 5 characteristics — location, gender, species, age and size. Each answer sets a different result. For example, if you pick “bud light” under question 3, you’ll get a dog.

Screenshot 2015-10-26 00.20.45

The page is not much to look at, and that’s largely because I had a lot of confusion with combining DOM in p5 and also editing CSS and the HTML file simultaneously…Organizing things on the page in a way that didn’t look awful was difficult (and I still haven’t succeeded). I also couldn’t figure out how to do certain things like make a button open a link. I think the combination of using P5 and CSS was confusing in particular.

Sometimes, particular answers don’t actually have any adoptable pets (for example, an extra-large baby pig in New York). One challenge I had was figuring out how to 1) read the JSON file to confirm that this was the case, and 2) write the code in p5 to reflect if there was no match. I’m happy to say I sorted it out by looking in the JSON file and seeing that there was no “pet” name when there was no match, so I simply wrote the line if (data.petfinder.pet == undefined) followed with some text saying that there was no match.

Screenshot 2015-10-26 00.36.43

The concept for this project was a bit silly (which is increasingly looking like a theme in my work…), but the nice thing about using a real API is that it’s actually connected to the real world of pets that need homes. On the match page, you can click the “in love” link to go directly to your soul mate’s Petfinder page, and maybe even adopt!

You can try Soulmate Machine here. My P5 code is below.

Continue reading “[icm week 8] Soulmate Machine (data & APIs)”

[icm week 7] The Beautifying Mirror

Screenshot 2015-10-14 12.53.41

(See The Beautifying Mirror here.)

It was fun to move out of the canvas with DOM this week. All the HTML/CSS stuff really brought me back to my early days on the web, hand-coding Harry Potter fansites in middle school. (Back before we thought this might actually be a useful skill to pursue!)

That’s probably why the page I made this week is sort of early-2000’s nostalgic in style. I wanted to do something with the webcam feature, so I pulled a frame image off the googles and set the camera capture inside. My goal was to play with the idea of “improving” your appearance with the slightly disparaging encouragement of the text on the page. I hope it’s at least a tiny bit unsettling.

IMG_0452
my friend Chris tests the mirror

I made my buttons and text in my sketch and created a separate CSS stylesheet.

In the future, I’d love to take this idea a little further with facial tracking software and the ability to screenshot your final image. (And probably better assets that weren’t just random things I found as quickly as possible.)

Check it out!

My sketch.js code is below, but it doesn’t include my stylesheet or index HTML.

Continue reading “[icm week 7] The Beautifying Mirror”

[icm week 4] Allergic to Love, v2.3

Screenshot 2015-10-01 00.33.44

[TLDR: Here’s the second iteration of my game, Allergic to Love.]

Our assignment this week was to clean up the code of a previous assignment, which was quite welcome because my code from last week was a total mess. I’m not completely sure that it’s now sparkling clean, but it’s definitely much better than it was before.

Before I made any changes to the game, I went in and reorganized the code. Having not yet learned arrays or objects in class, I was wandering about in the array wilderness a little bit last week and ended up doing something really weird with them. I think I fixed them up now after looking up how to do an array of objects. I found the jitterbug example  to be particularly helpful. Now my falling hearts are arranged like this:

function Falling() {
  this.x = random(width);
  this.y = random(-650, 0);
  this.broken = 0;
  this.hitByLaser = false;
  this.hitTheGround = false;
  this.speed = random(1, 4);
  this.clr = color(255, random(0, 255), random(0, 255));

  this.move = function() {
    this.y += this.speed;
  };

  this.display = function() {
    strokeWeight(7);
    stroke(this.clr);
    fill(this.clr);
    bezier(this.x, this.y, this.x - 12, this.y - 12, this.x - 11, this.y + 8, this.x, this.y + 14); //left 
    bezier(this.x, this.y, this.x + 12, this.y - 12, this.x + 13, this.y + 8, this.x, this.y + 14); //right 
  };


I went in and created a lot of my own functions as well.

Finally, I started adding on to the game itself.

Screenshot 2015-09-30 23.21.22

Adding sounds made a big difference. I found music from the Free Music Archive and sounds from Free Sound. I’m not really sure where the proper place to attribute would be…I put it in comments in my code for the time being.

Screenshot 2015-09-30 23.23.11

Besides sounds, I made a few other changes — the girl now bounces up and down, the landscape is a bit different, and she smiles if you win the game. (But it’s still pretty hard to do so!)

Play the game here.

My full code is below.

Continue reading “[icm week 4] Allergic to Love, v2.3”

[icm week 3] Allergic to Love v. 1

Screenshot 2015-09-24 03.21.50

[TLDR: Here’s my (unfinished but finished-enough-for-this-assignment) game, Allergic to Love.]

Oh man, this was a rough one. The beginning was good: Esther and I partnered up to start this project. I really wanted to make a game, so we went down the path of trying to build something that involved shooting at objects that moved on the screen.

Together we got as far as making things fall down, making things shoot up, and coming up with an interim solution for making objects disappear as they got hit. Esther did some pretty awesome work figuring out how to use arrays and create functions, and then we took that code and built separate things on top of it.

I quickly realized that what I wanted to do this week was beyond the scope of what we’ve learned so far in class, so it was quite difficult to sort out some specific things. Once I came up with the theme of the game, it took me a really long time to figure out how to make all the falling objects in the shape of hearts. After some experimenting with for loops, making functions, arrays and bezier curves, I got it!

Screenshot 2015-09-23 19.55.00

This was very exciting. I started adding things like making them fall from different heights and at different speeds. Some of the trickiest stuff to figure out was how to make things happen in the win state and lose state. I ended up having to add a bunch of Boolean arrays. It also started to come together aesthetically.

Screenshot 2015-09-24 03.20.04

I added some fun things, like making the girl’s skin turn green every time a heart hit the ground. (She’s allergic, after all.)

//if the heart hits the ground
    if (hearts.y[i] == height) {
      if (hearts.hitTheGround[i] === false) {
        hearts.onGround++; // skin changes color
        skin.r = skin.r - 10;
        skin.g = skin.g + 5;
        skin.b = skin.b + 5;
        hearts.clr[i] = (0); //hearts turn black
      }
      hearts.hitTheGround[i] = true;
    }

I also had some crazy mishaps experimenting with the gradient that frankly look way cooler than what I was going for.

Screenshot 2015-09-24 00.55.23

There’s still a lot I want to do, and the code is incredibly unfinished and messy. But it’s almost 4 am and I got this thing in a playable state, so I guess now is as good a time as any to stop. And even though I’ve been playing it all evening, it’s pretty hard! I feel like there’s still a lot to improve on here, but this will have to do for version 1.

Screenshot 2015-09-24 03.38.15

Check out Allergic to Love, v.1!

My (extremely messy) code is below.

Continue reading “[icm week 3] Allergic to Love v. 1”

[icm week 2] The beach

(TL;DR: The final sketch is here!)

Create a sketch that includes (all of these):

  • One element controlled by the mouse.
  • One element that changes over time, independently of the mouse.
  • One element that is different every time you run the sketch.

This week’s exercise builds off of what we learned last week and added more dynamic, interactive and/or moving pieces.

I had an idea to do a sunset scene, where the mouse would control the sun and the rest of the elements would change when the sun went down or up. One of the first things I did (pictured above) was divide the height in two to make horizon. Then I made the ocean by making a large blue arc expand slowly, creating the effect of the tide coming in.

But I wanted the tide to also recede,  so I looked up how to use an “if…or” statement:

[javascript]if (oceanWidth = 800 || oceanWidth = 699) {
tideO = tideO * – 1;
}
oceanWidth = oceanWidth + tideO;[/javascript]

This basically made it so that when the ocean arc reached a certain size, it would get smaller until it reached its minimum size, at which point it’d get bigger again.

I discovered the helpful lerpColor() function, which allowed me to easily make a gradient of colors for the sunset.

Screenshot 2015-09-12 14.33.12

But I also wanted to make the colors change as the mouse (aka sun position) changed. I figured that if I could make alpha—or opacity—a variable, I could make it change according to the y position of the mouse. I ended up making two variables that controlled opacity, one for more intense color changes and one for less.

[javascript] a = mouseY;
b = mouseY/6; [/javascript]

I used these for opacity in my lerpColor() function.

[javascript]from = color(225, 22, 84, a);
to = color(243 – b/2, 255 – b/2, 189 – b/2, a);[/javascript]

I also ended up using these variables in a slightly different way as well — by adding or subtracting values to the rgb codes, I could also make the colors brighter or darker as the mouse moved. So my color variables ended up looking like this:

[javascript]cloudColor = color(218 – b, 240 – b/2, 247 – b/2);
oceanColor = color(36 – b, 123 – b/3, 160 – b/3);
whiteWashColor = color(139 – b, 240 – b/3, 238 – b/3);
sandColor = color(194 – b/2, 178 – b/2, 128 – b/2);
sunColor = color(247 + a, 94 + a, 3 + a);[/javascript]

Screenshot 2015-09-13 20.23.46Screenshot 2015-09-13 20.23.55

The screenshots above show you what it looks like when the sun is up vs when it’s down. I’m happy I was able to make the sky change dramatically, while allowing the trees, sand and ocean change more subtly.

For the element that changes each time you run the sketch, I have two birds moving semi-randomly across the sky. And for fun I added a little crab that comes out only when the sun goes down. I haven’t figured out how to make these random movements less jarring and terrifying, which would probably help make the entire scene a bit more relaxed and chill as a beach should be. Oh well! Maybe it can just be the eternal dusk beach of your nightmares.

Screenshot 2015-09-13 20.39.11

As with last week, I had a ton of fun making this sketch. The screenshot above is just a still, so check out the full thing here.

The code is below.  Continue reading “[icm week 2] The beach”

[icm week 1] Draw a portrait using code

Screenshot 2015-09-09 18.07.42

(TL;DR — See my final drawing here!)

As a person with no experience with either art or programming, our first ICM homework assignment to draw a portrait of our classmate using code felt quite daunting.

But once I jumped in, I had a lot of fun, even though I definitely didn’t go about the process in a particularly efficient way.

I started by doing a (very rough) sketch on paper based on the picture I took of Isabel in class. Then I tried to code her hair using the curve() and curveVertex() functions.

Screenshot 2015-09-06 17.28.18 Screenshot 2015-09-06 18.05.26

This did not go very well. I quickly realized that graphing out my sketch would make it much easier to plot exactly where I needed to place the curves and other shapes.

IMG_9936

Forgetting the existence of graph paper, I drew out a 30 x 20 graph, which multiplies out nicely to my 750 x 500 canvas size. I then redrew my sketch and plotted out coordinates. I made an Excel sheet to quickly multiply my sketched points by 25 to fit my canvas size, which was helpful for both my calculations and for remembering how to use Excel.

Screenshot 2015-09-08 15.28.26 Screenshot 2015-09-08 23.36.03

I’m sure this would have been much easier if I used Photoshop or some other tool to tell me what position each pixel was at, but I went ahead and used the ol’ pencil and paper method anyway. And also a lot of trial and error.

Screenshot 2015-09-09 10.24.12

I still don’t feel like I fully understand how to use curves. More specifically, I don’t fully understand how the “control points” interact with and change the curve. I also still don’t know how to change the angle of a curve in the middle of a long curveVertex() sequence. If you look at my code below, you’ll see that I kind of hacked it by putting a bunch of shapes together in the background.

I also had some trouble with arc() to begin with because in order to get the eyes angled in the way I wanted, I had to remember basic trigonometry. I ended up figuring out that you could multiply the radians in the code, and so the angles of the eyes came out like this:

[javascript]arc(325, 198, 50, 54, PI + ((1/10) * PI), TWO_PI); [/javascript]

And I added some flashing rainbow colors for fun:

[javascript]rainbowColor = color(random(0, 255), random(0, 255), random(0, 255)); [/javascript]

Overall, I enjoyed this exercise a lot and felt like it was a good way to dive in to the basics of programming, and taught me how to look things up and ask questions.

I’m pretty happy with the result!

in (1)

Note: this is a gif version of my sketch so it looks a little weird, but it gives you the idea. See the final sketch here.

The code is below.  Continue reading “[icm week 1] Draw a portrait using code”